Showing posts with label DIY Tips and Products. Show all posts

Easy Fabric Painting - "Sweet Dreams" Pillowcase for Mom

#Fabric Painting, #Easy fabric project, #Pentel, #gift for grandparent, #family love, #90th birthday, #Florals-Family-Faith, #Cindy Rippe, #Desmond Tutu quote, #Family quote, #quilt design pillowcase
Pillow case painted with Pentel Fabric Fun products - ©CindyRippe2013
We celebrated my MIL's 90th birthday recently.  She wanted a party with just her immediate family and we were lucky to get most of them to attend. I understand how she feels. Those are my best visits, when we get to spend time with our own little family.  Lives are so busy now that it's not easy to get everyone together. Many times it's at a larger event, which is fun too, but doesn't leave much time for a more personal visit.

We had a picnic at Larry and E's house and everyone chipped in to keep things easy.  I did come up with a few activities including this Sweet Dreams Pillowcase.  There are 25 people in the family, including Mom, so I came up with the idea to create a very simple design to mimic a quilt.  (Mom is an expert quilter and still quilts each week with the ladies at church)  I told her we made it so that she could sleep with the people that love her.

After ironing freezer paper to the inside (to stabilize and prevent bleed through on the fabric) I marked off the squares and Karina drew all the stitching lines.  I did a simple outline of each leaf and flower while leaving enough space for each person to be creative within the square that they chose.  We used the Fabric Fun Dye Sticks to color and the Gel Roller for Fabric for their name or additional details.  (there are few unfinished squares in this image but they were completed the next day)  Mom just had to cover the design with a pressing cloth (or printer paper) and iron to permanently set the dye.

I love the variety!  For Romas, the youngest, almost 2 years old, we held our hands over the edges to keep his drawing within the square.  He's pretty creative though, he quickly reached over our hands to draw on additional squares.  You can see one of the marks on Bella's square.  Everyone seemed to enjoy themselves and wanted to make sure that Mom knows how much she means to us.  It was a really nice day.

You don't choose your family. They are God's gift to you, as you are to them.  Desmond Tutu

DIY Temporary Paint technique for a Party Tablescape

This is the technique that I use for temporary paint on glass dinner plates.  I've shared my St Patrick Day plates (click here) and this pink set for our Easter tablescape (click here) a few years ago.

I have a set of glass plates that I decorate according to whatever party theme I'm working on.  It's cheaper than buying multiple sets of dinnerware and pretty easy to do!  I mix DecoArt Americana Acrylic paints with Sta-Flo liquid starch and sponge the mixture on the back only. I prop each plate on a bowl after painting to dry.
Temporary Glass Painting on plates, Americana Acrylic Paints, DecoArt, Liquid Starch projects, Sta-Flo, original technique by Cindy Rippe, Florals-Family-Faith, Cindy Rippe
Temporary Glass Paint Technique ©Cindy Rippe 2010-2013
It's best to sponge two coats of paint for opaque coverage.  Originally I planned to be really creative with this set and paint white tulips first (still on the back side so it would show first under the glass when the plate was right side up).  That didn't work......they blended away when they got wet again as I started sponging on the pink layers.   For the St. Patrick's Day plates I adhered printed scrapbook paper circles using the liquid starch for the centers. That worked much better.

Temporary Glass Painting on plates, Americana Acrylic Paints, DecoArt, Liquid Starch projects, Sta-Flo, glass painting, original technique by Cindy Rippe, Florals-Family-Faith, Cindy Rippe
1st and 2nd coats of Temporary Glass Paint Technique ©Cindy Rippe 2010-2013
I always let the plates dry overnight before using.  Then clean the front of the plate off with a mild solution of vinegar and water to clean them before setting the table.  There's usually a few finger smudges and sometimes a little paint by the time you're done with all the sponging.  This paint technique is durable when dry for handling and stacking the plates and pretty easy to clean off after the party.  I soak the plates in warm dishwater for a few minutes and wipe the paint off using a paper towels. (You don't want the paint to go down the drain, it's kind of stretchy plastic when it softens in the water.  It is acrylic paint remember?)  I think this is a really fun project and adds a special touch to a party.


Creativity is inventing, experimenting, growing, taking risks, breaking rules, making mistakes, and having fun.  Mary Lou Cook

A Painted Shamrock Plate at the end of the Rainbow

We've spent most of the day cleaning, shopping and finally moving office furniture in the rain, and I'm exhausted.  It will be a while until I can call this room finished but I'm encouraged that we've done so much already. On our last trip across town, with the back of the car loaded for the fourth time, the rain stopped and the sun came out.  As we crossed the bridge we saw a huge rainbow and Lee made a comment about the fact that we were heading toward the Leprechaun's pot of gold.That reminded me of St. Pat's Day and I remembered this post from a few years ago. It would be simple way to add a special touch to your dinner table so I thought I'd share it once again.  Enjoy!

Previously posted on the Art in Entertaining Blog - 2010.

I decided to get creative for St Pat's Day this year.  I used a permanent pen to sketch a few shamrocks onto scrapbook paper (BOBUNNY Alissa Adorable is the pattern).  Next, I cut out a circle to fit my clear glass plates.
Painted plate, Shamrocks, Pen & Ink, Decoupage, Glass Painting, St Pats Day, Florals-Family-Faith, Cindy Rippe
Shamrock Plate - Pen & Ink on scrapbook paper and decoupaged onto a painted plate. ©CindyRippe2010 - 2013


I then used liquid starch to temporarily decoupage it to the back of the plate.  The next day I used my favorite "temporary paint" mix; DecoArt Americana Acrylics and Liquid Starch, to sponge green on the back of the plate and finish it off.  (I've used this technique many times to decorate the plates for different events instead of buying paper plates) Unfortunately, Lee wasn't home for dinner that night so I just used one of the plates to eat leftover pizza all by myself.


An Irish Blessing

May these walls be filled with laughter,

may it reach from floor to rafter.

May the roof keep out the rain,

may sunshine warm each windowpane.

And may the door be open wide

to let the Good Lord's love inside.

Garden Tea Party Tablescape with DIY flower decor

Garden Tea Party – “Mad Hatter’s Delight”
Another CHA Designer Tablescape that I helped with.
Designed and Created by: Kelly Hoernig-Lead Designer and Cindy Rippe

You are cordially invited to the “Mad Hatter’s” Garden Party where size does matter! Another tablescape that I worked on for the Craft and Hobby show. Our theme is loosely based on Alice in Wonderland where you will find all things big and small. Enchantment and creativity will fill this garden table with everything from tiny creatures to extra large blooms. It’s a party you won’t want to miss!

photo ©CindyRippe 2007
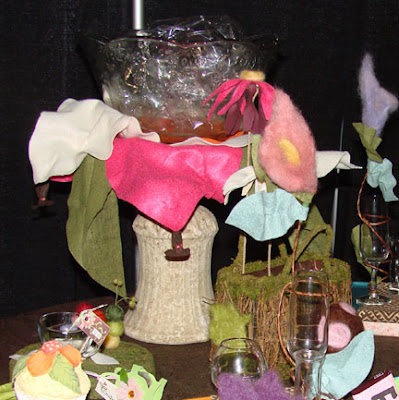
Kelly Hoernig's Floral Punch Bowl

Kelly created giant petals from felt to make the base for the punch bowl.  She also made felted flowers for each place setting.
My giant cupcake with fondant flower decor


photo ©CindyRippe 2007
Felted Caterpillar and flower cup cozy by Kelly Hoernig

My cupcake was really made with air dry clay for the show display but can be made with fondant as a desert or party favor.  More of Kelly's felting techniques wereused to make the adorable caterpillar. The placemat is made of moss with felt flowers by Kelly as a cup cozy.
photo ©CindyRippe 2007 
I decorated a vintage magnifying glass with beads that can be used to read the miniature note "drink me". 

Why, sometimes I've believed as many as six impossible things before breakfast. Lewis Carroll, Alice in Wonderland

Family Tree - DIY Baby Shower Tablescape

photo ©CindyRippe2007 - Design by Cindy Rippe, Kelly Hoernig, Elaina Pecora and Phyllis "Sanford 2007 
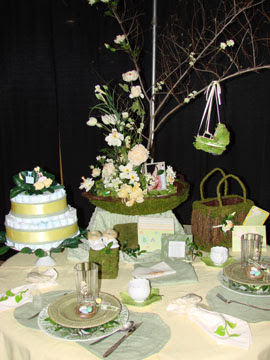
As part of the Craft and Hobby Show the Designer members created a special display of tablescapes made with craft materials that featured Manufacturer member products.  It was a way for us to showcase our skills as designers and encourage DIY projects for parties and events.  This is one of the tables that I worked on entitled "Welcome to the Family Tree". I had a great time working with my fellow designers and was really impressed with their creativity.
photo ©CindyRippe2007 - Design by Cindy Rippe, Kelly Hoernig, Elaina Pecora and Phyllis "Sanford 2007
Baby Shower - "Welcome to Our Family Tree"
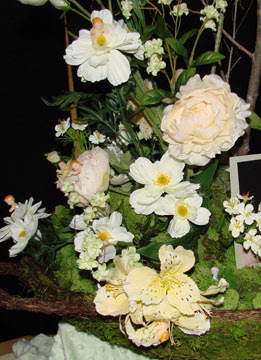
CHA Designer Tablescapes #1 -Designed and Created by: Cindy Rippe,Elaina Pecora, Kelly Hoernig and Phyllis Sandford.  Notice how the flowers and crafts that look like flowers play a big part in this design.

  photo ©CindyRippe2007 - Design by Cindy Rippe, Kelly Hoernig, Elaina Pecora and Phyllis "Sanford 2007 photo ©CindyRippe2007 - Design by Cindy Rippe, Kelly Hoernig, Elaina Pecora and Phyllis "Sanford 2007
Gifts for the baby are used to create the tablescape. Receiving blankets for the tablecloth, "burp" pads for the placemats, diapers for the cake centerpiece, little toy birds sewn for napkin holders, crocheted blanket, photo album, scrapbook organizer bag (to be used for a diaper bag) and more. Moss baskets used for the fabulous "Family Tree" centerpiece (mini babies were tucked into the roses!) and the cookie basket can be used to store baby items in the nursery. Roses on the diaper bag and cake are made from baby socks. Little felted nests are tucked into baby shoes, a memory box (tube), crocheted baby booties, a punch needle onsie, painted dinnerware and so much more could be found in the display . The floral decor on the back of the chairs can be reused to decorate the curtains or windows in the nursery. Guests are invited to paint little fabric squares instead of playing games. The finished squares will be made into yet another gift for the baby, a special quilt! Once they are told how the tablescape is created, Moms to be love to search for all the items they'll be taking home from the table! 

Crafts make us feel rooted, give us a sense of belonging and connect us with our history. Our ancestors used to create these crafts out of necessity, and now we do them for fun, to make money and to express ourselves. Phyllis George

Designing with something New to me

©CindyRippe2007
Rosebud painted with Aquash watercolors ©CindyRippe2007
Last week I worked at the NAMTA show in Chicago for Pentel Arts. (National Art Materials Trade Association) I used watercolor crayons, a brush that holds water in the barrel, assorted brush pens and more. I'm used to these products and was able to adapt my painting style easily to them. Here's a rose that I did with the Aquash Watercolor set. The products I did not looking forward to using were the fabric painting tools. Fabric painting, in general, has always been on the bottom of my list. But this was something entirely different. I was able to outline my design with a Gel Roller for Fabric pen and filled it in with Fabric Fun dye sticks. It was really easy! Trace n Paint! The pen wrote easily even on terry cloth bibs. The pens are permanent and machine washable when dry but the Fabric Fun has to be heat set. Simple enough with an iron and pressing cloth. I can't wait to get started on projects for publication with this product.

Believe it or not, it's time to submit Christmas projects to the magazines. I'm concentrating my design efforts on tabletop and party items so I think it will be a Christmas themed table runner and napkins. And just for fun; a cute baby shirt or "onesie" (this could be given at a baby shower - I'm not stretching too far from my tabletop theme) Suzanne helped me with a few appropriate phrases since she's a young Mom so it looks like that will be next. Have a great day!

 Creativity is the power to create something new, to reach deep into our subconscious for that “aha” solution. Sometimes it happens in a nano second, and sometimes that solution can take a lifetime to reveal itself. Linda Naiman 
Related Posts Plugin for WordPress, Blogger...